Let me start by saying that I have been using iOS as my primary mobile platform since iPhone3. My household has owned at least one of every generation of iPhone since then, one of every iPad, and even a few iPods.
Thru all these years of consistent use, two essential things were missing that every parent of iOS using kids were screaming for:
- Real parental controls that were functional and actually limiting
- multiple users account on the device.
With this newest version of iOS, Apple has decided to do all us parents a favor by implementing ONE of these things we are dying for. We notice, and we appreciate it. Now please Apple, finish the job.
First, let me say that as much of an Apple fanboy as I seem to be, Google is the one who got it right first with Family.
We have iPads in the house which my kids use every day, and when Google launched Family, over a year ago, I went out and bought two android tablets just to test it.
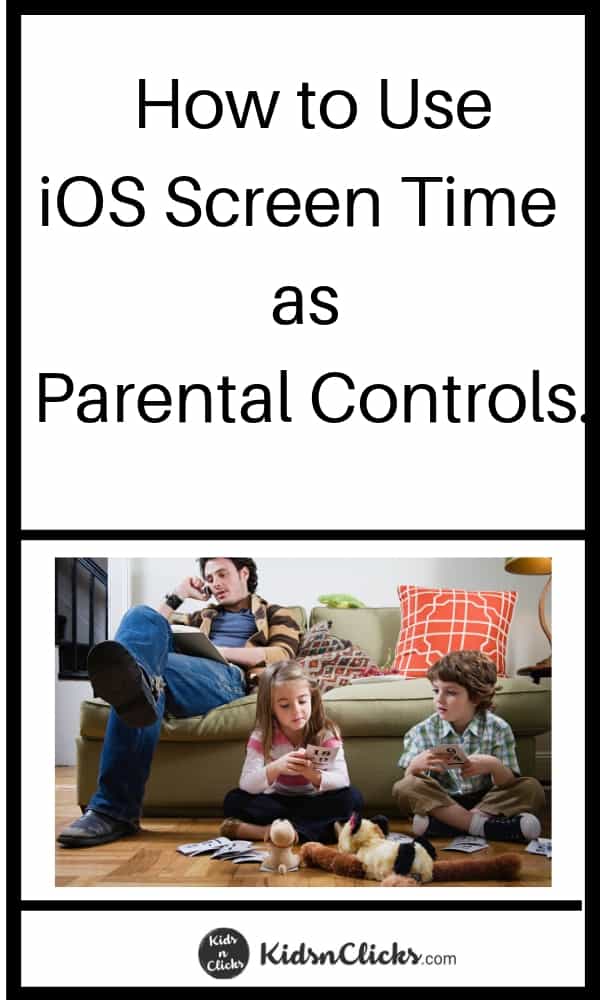
psst, don’t forget to pin this
I was sorry that I did. Not because it was terrible or didn’t stack up, but the opposite, because after using a real, comprehensive, granular control interface for family and child access management, It made Apple’s solutions seem really pale and anemic.
In other words, we knew we needed these features, but we didn’t miss them until we had already tried them. Now, almost a whole year late, again, Apple comes to the party.
This time, however, they have only half the solution we need.
Without multiple user accounts per device, the solution Apple brings, ScreenTime, though nearly perfect is woefully short of a total parental control suite on par with Google Family.
Don’t forget to get this free copy
Apple Parental Control Features
I wasn’t kidding however when I said that what they did bring was nearly perfect. So instead of browbeating Apple for not bringing the full deck, let’s look at what they did provide and why that half is so good.
In a nutshell, what Apple Screen Time allows a user to do is set limits on screen time, either by the device, or by the app, and then disables those apps after that screen time limit has been reached each day.
Let me say that again. You tell your settings on your device, lets say your iPhone, how long each day you are allowed to use social media, lets say FaceBook, and then after you have reached that allowed time limit, FaceBook shuts off, it greys out in the dock, and you can no longer click on it or open it. Period.
Yes, there is a passcode you can enter to allow yourself more time, but you have to WANT to do that.

While that can be life-changing for some people who need help settings limits on Snap or candy crush, it is indeed a game changer for parents when you couple it with Family Sharing features that have been under the hood since iOS9.
Now, I can set limits on my sons iPhone, they can allow the phone app itself to never time out, but only allow 30 min of Fortnite, and simultaneously completely block Snapchat.
I can let him play Minecraft for two hours on Saturday, but only one hour during school days, and never during the times that school is in session.
I can completely block all games during school time while never timing out the calculator or the calendar apps. The level of control that Apple has allowed me as a parent now is really unbelievable.
Don’t forget to get this : Children’s online safety book
Apple compared to Boomerang Parental Control App
A year ago I started testing the Boomerang Parental Controls app. It was awesome, but it had a few flaws. My family utilized it for a long time, and it helped to bring some control to my children’s multiple devices, but it had holes in it that my kids quickly learned to exploit.
I was happy to have it because it gave some of the control that iOS was so lacking at that time. Now, with Screen Time on iOS 12, coupled with Family Sharing, I am very much in control of my children’s screen time, app usage, and all in a very convenient way, from the notifications screen on my own iPhone.
Yes, I still lack multiple user accounts so I cannot allow my children to use my personal devices ever, but as long as they have their own iOS device, they are all set.
If my child uses all their screen time today, they can request more. That pops up a notification on my device, that allows me to approve or deny, (which is why my kids can NEVER use my devices) and even has a few preset time extensions so I can quickly give them an extra 15 min or hour.
More importantly, that time extension is for only that app. Therefore if I allow my son to play only 30 min of Fortnight and only on weekends, but he asks for an extra hour of time on a Tuesday to use Codea, he can’t then use that time, the way he could with other parental controls apps, to log in and play Fortnite instead.
Don’t forget to get this free copy
I approve an hour for Codea, and that is all he can use it with. If he changes his mind and wants to play something different, he has to request time for that app too. This I find very useful. It addresses many of the common problems that have plagued third-party parental control apps.
Also, due to this all linking thru iCloud, not only is it all very secure, it is updated in real time at the OS level, and there is no way that my kids have found to work around it.
With apps like Boomerang Parental Control, they would learn when their restricted time started and turn off their wifi a few mins before, effectively neutering the controls app and allowing them uninterrupted play forever as long as they played offline.
Couple that with apps like TV, Youtube and Netflix that allowed them to download hours of content, and they effectively could stay up all night on their device with little or no restriction.
Now that these controls are cooked in at the OS level and are updated thru iCloud the same as Notes or iMessage, there really is no way for the kids to circumvent it, at least not one they have found yet. So the next part, after singing its praises here for a while, is to walk you through a typical setup of these new features in iOS 12 called Screen Time restrictions.
Setting up Apple Parental Control
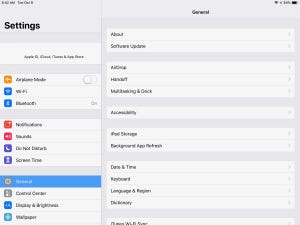
When dealing with Apple ScreenTime parental controls, the first thing you have to do after your device supports it is to FIND it, because it isn’t in parental controls as one would think; instead, you have a new tab in the settings menu called Screen Time. (Not exceptionally intuitive if you asked me, but they didn’t, so there it is.).
Merely going to that tab doesn’t start you down the path to app controls and time limits for your children though, at least not if you haven’t set up your family yet.
I know this may sound like a no-brainer, but up until family sharing, there really was no incentive to set up a family, so many people I know, especially the ones with only one child, have never done this, instead, they log in each device into the same iTunes account and share all the apps and media that way.
However, now, if you have children and you want to control their device time in the simplest way possible (which still isn’t easy) is setting up a family, making both parents a parent account, (this is important later) and then inviting all your kids to join it. This is the wave of the future, according to Apple.
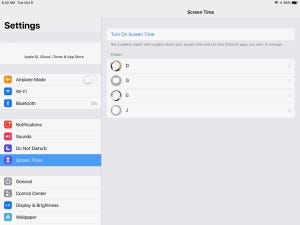
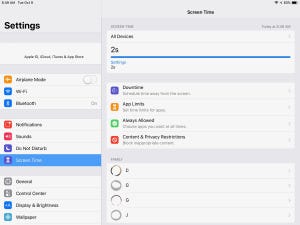
Next, now that you have a family set up, you are a listed parent/admin, and you’re kids are all linked to it, Now you can go to that Screen Time tab in settings. When you do, you will now see each of your kids listed below your own account. Turning on Screen Time for yourself is an option, you can if you think it will help you, but it is not needed to administer your kids devices.
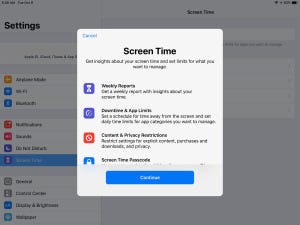
After turning it on for yourself, or clicking on one of your children accounts listed below yours, you will have a series of pop-ups that walk you thru the setup procedure. Answer each question that is asked, like if this is device is for you or your child. One significant note here is that any restriction you set during the setup when you first turn it on is a restriction to YOUR device for YOUR use,
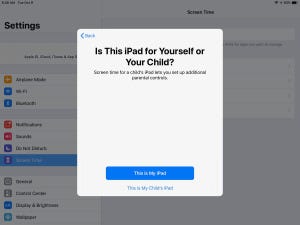
not your kids. If you click on one of your children, under the “Family” tab further down, those settings will only apply to that child
. Therefore, you will need to set up the restrictions you want for each child separately.
As I said, this isn’t easy, but it is worth it.
Also, you do NOT have to do this from their device, you can set and later modify their limits and restrictions, from YOUR device without having their device present, as long as their device is updated to the current version of iOS and is signed into their cloud account and that account is set as a child in your family.
When you do start setting the restriction on your child’s device, the first thing you are prompted to set is Passcode. You have
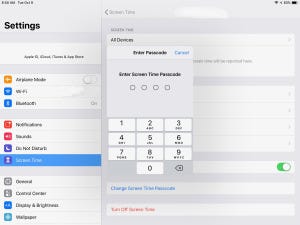
Choosing the right passcode
heard me say this several times before and I will repeat it again here. Choose a code that you and you alone will remember.
Make sure it is NOT a PIN you use for anything else in your life, believe it or not, your kids probably already know your PINs to everything you have one for.
They are savvy little creatures, and they learn early on how to spot your pin.
They will check the fingerprints on the glass of the device, watch you thru the rear windows of the car as you drive thru the ATM, they listen as you use them to confirm your identity over the phone when your bank or insurance company calls.
You use your PIN code all the time, and they learn it quickly. If your PIN is your passcode to get into your phone or device, assume they already know it.
They watched you enter it so they could play that game when you needed them to be quiet in that meeting… you get my point.
Don’t forget to get this : Children’s online safety book
How to pick a good PIN
- When you do set this parental controls PIN, don’t use one you use for anything else. Not only do they probably already know it, but if they don’t, they will also be trying really hard to learn it, and you don’t want to have to change 10 PIN numbers just because your kids learned the one you use in parental controls.
- Pick a random number, one that isn’t connected to anything, any date, any anniversary, anything at all that they could think thru. They will, and they will learn it.
- Make up a new one, one that is not connected to anything, I call my parental controls app PIN my “Burner” PIN. I know it will be breached and I know I will have to change it often. On the upside, if your child tries to guess it, you will be alerted to the number of failed attempts the next time you log in on their device. THIER DEVICE. We will talk about that later.
Don’t forget to get this free copy
How to set Downtime on your kid’s devices
The next thing you set is the “Downtime.”
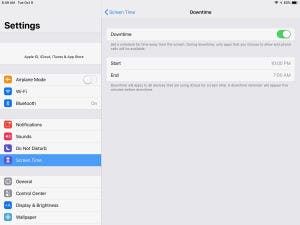
Once you turn Downtime on for your child, it asks you when downtime will start and stop.
This can be a little confusing as downtime “Start” is when you want the device to shut off, and downtime “End” is when you want the device to be usable again, so kind of backward of what one may expect.
If you have any experience with other parental controls apps, they all word this similarly, so this should be very familiar.
How to set Screen Time Limits on IOS
At the next step in setting up the Time Limits restrictions of parental controls in iOS, you come to a pop up titled Choose Apps.
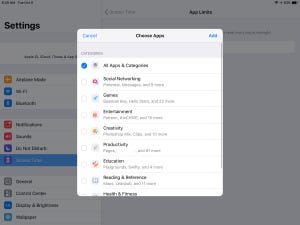
In this pane, you can choose which types of apps you want to limit with the restrictions you are setting.
This is handy if you are setting these for yourself or for your teenage child, but for anyone under 14, my recommendation is to check the line marked “All Apps & Categories” as this will make screen time restrictions effectively lock out the entire device.
This is handy if you are trying to just limit your own use of social during the work day, or if you want to limit just games for your child, however what I quickly found is that the app developer decides what category their app is in and that, like finding these parental controls in a tab marked “Screen Time”.
You see my point. If you mark “All Apps & Categories” when you first set this up then find that it is too strict, you can always lighten up and adjust it over time, which we will discuss a bit further in.
The next screen you will be presented with after choosing the apps and categories is “Always Allowed.” This one is a wildcard and will completely be up to you.
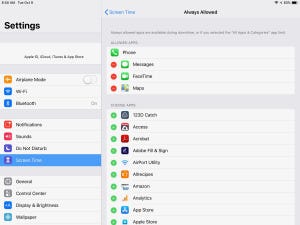
What is “Always Allowed” in IOS 12
The base startup “Always Allowed” configuration as I found it was Phone, Messages, FaceTime, and Maps set as always allowed, with the ability to add any other app on the device to this category by clicking the green plus next to that app in the list following the “Always Allowed” section.
Again, for my own children, I turned everything except Phone off, knowing that there would be some things, like Maps, that I would want to turn back on later.
Don’t forget to get this free copy
Preparing kids for parental control app
In my opinion, it is easier to lighten up on a kid after coming on to strict at the beginning, that way, you can have the device set the way you want it after a few weeks while keeping them feeling like they are getting more than they were….
Just a trick my Dad showed me that I still use.
If you start out too easy, then their baseline is set too low when you toughen up, they feel restricted.
If you come on as far too strict, then lighten up a little, they feel more free, like they have more than they started with so it is a better deal for them, you are on their side, just trying to make it work, not against them trying to ruin their life.
Don’t forget to get this : Children’s online safety book
Setting Privacy Restrictions
Next, after we choose which apps we are affecting, we get to the meat and potatoes of the software, the Content & Privacy Restrictions page.
You may as well settle in for a while here, because not only is this the main page you will be using for the rest of your setup and the page you will be bounced back to every time you make a choice inside some of the categories.
This is also the page you will use the most for the day to day administration of the restrictions on your child’s device.
Here, after turning the restrictions on with a slider at the very top, you have a laundry list of options below, but that’s not all!
The three primary tabs directly under the activation slider are :
- iTunes & App Store Purchases
- Allowed Apps
- Content Restrictions
and while some of these could be mistaken for things we already dealt with, and it also sounds like a short list, it isn’t.
These are each an elaborate submenu that will require lots of thought and many settings and are also very inconvenient.
In some of these submenus, when you click anything at all, you will be bounced back out to this menu page and will then have to navigate all the way back into where you were just one click ago.
It is really time-consuming and tedious, but the results are worth it, trust me.
I am not going to go in depth on each submenu selection, but they are many, this is a very comprehensive and granular set of controls.
Take the time to go through each tab and each category, guess if you have to, but set them the way you think will work best for you.
psst, don’t forget to pin this
Conclusion
The last thing you need to do is to set yourself a reminder to log in and check their device often.
I do it every night before bed when I collect all the devices for charging.
Also, I have talked to them all ahead of time and set a rule that if they try to breach my restrictions PIN or my ScreenTime PIN, they lose their devices for a day, if they try too often, they lose it for longer.
I know that taking the time each night to check all your kids’ devices is kind of a pain, you will not remember to do it each night, but do it often and don’t beat yourself up too hard for failure. However, don’t get complacent.
Parenting is an active sport, something you have to do with purpose and intent and often it is a hard job, but it is YOUR hard job, so just do it.
Your kids will thank you later.
If you find this guide helpful please share it with your friends. If you have any additions or corrections, please let me know in the comments and good luck. Parenting doesn’t come with an instruction manual, but Parenting with Technology can.
This article was written by : Andrew Keisier from @ParentingwTech
Here are tips to you keep children safe in the digital age :
Tips for Non-Tech Savy Mums :4 tips to digital parenting for non-tech savy mums
Stop kids from being datafied : Are your children datafied from birth
3 dangerous places for children to be online : 3 places kids should have limited internet access
Finally don’t forget click below:
Children’s online safety book- teach them about internet safety from a young age. For 3 -10 years old
Was this helpful?
Good job! Please give your positive feedback
How could we improve this post? Please Help us.